Monday, December 31, 2018

ALMOND STICKS

This recipe is a family favorite...My mother used to make these every year for Christmas, and now her tradition is passed down to me and my girls. The recipe makes a lot and can be halfed. If you are into cookie dough - this one is delicious!
2 Cups Butter
4 Cups Almond Meal or Ground Raw Almonds (you can get Almond Meal at Trader Joe's for a reasonable price)
4 Cups All Purpose Flour
1 tsp Salt
2 Cups Sugar
6 Eggs
1 tsp Almond Extract
1 tsp Baking Soda
Yellow Food Coloring (optional)
Multi-Colored Ball Sprinkles

Do not preheat your oven - this dough needs to chill.

Cream Butter and Sugar. Add in Eggs and Flavoring and mix until well blended. In a separate bowl, combine dry ingredients (Almond Meal, Flour, Salt, Baking Soda). Add dry ingredients to wet a little at a time until all is incorporated. You can add some yellow food coloring if you prefer your cookies a little blonder.

Form dough into several rectangular loaves about a half inch thick by placing a line of dough onto slightly floured wax paper and then fold the wax paper around the slightly floured dough line pressing down to flatter. I realize now that a picture of this step would have been helpful so I will try to add one...
Chill dough overnight.

Preheat oven to 350 Fahrenheit. Cut the loaves into thin sticks and gently press one side into the sprinkles. Place cookie sprinkle side up onto cookie sheet covered with parchment or a silpat liner.
Bake for approximately 12 minutes - these cookies do not get very brown. Remove from cookie sheets immediately after baking.

Wednesday, December 19, 2018

BROWN BUTTER SALTED CARAMEL SNICKERDOODLES


INGREDIENTS:
2 1/2 Cups All-Purpose Flour
1 tsp Baking Soda
2 tsp Cream of Tartar
1/2 tsp ground cinnamon
1 tsp Sea Salt
1 Cup (2 sticks) Unsalted Butter
1 1/4 Cups Dark Brown Sugar - packed
1/2 Cup Granulated Sugar
2  Large Eggs
1 Tbs Vanilla Extract
1 Tbs Sour Cream (Greek Yogurt can be substituted)
Trader Joe's Fleur de Sel Caramels - cut in half

For Coating The Cookies:
1/4 Cup Granulated Sugar
2 tsp Ground Cinnamon
Sea Salt - for sprinkling on top

First, brown butter by placing it in a small skillet over medium heat and cook until melted. Continue cooking until it becomes slightly foamy and small flecks form on the bottom. Cook until the bits turn brown and the butter has a nutty aroma. Remove from heat and cool.

In a small bowl, whisk together dry ingredients (flour, baking soda, cream of tartar, cinnamon and salt). Set aside.

In a stand mixer ( a handheld is fine also), cream the brown butter and sugars. Beat in eggs, vanilla and sour cream until combined. Slowly add dry ingredients until combined. Form mixed dough into a ball and wrap in plastic wrap. Chill for at least a half hour. Longer is fine.

For coating the cookies, in a small bowl, combine sugar and cinnamon.

Preheat the oven to 350 degrees F. Measured chilled dough into a ball (about two tablespoons) and flatten slightly. Place a half caramel in center and wrap dough around caramel.

Roll dough balls in the cinnamon sugar and place on a baking sheet lined with parchment paper or a silicon liner. About two inches apart.

Bake the cookies for approximately 8 - 10 minutes until the edges turn slightly brown. Do not over bake! The center of the cookie will be soft due to caramel filling. Sprinkle cookies with sea salt and let cool on cookie sheets for two minutes, or until set. Transfer to a wire rack to cool completely.

Try not to eat them all! They are addictive!


Thursday, November 15, 2018

Salted Molten Caramel Chocolate Muffins

SALTED MOLTEN CARAMEL CHOCOLATE MUFFINS
1 1/2 Cups All-Purpose Flour
3/4 Cups Sugar
1/2 Cup Unsweetened Cocoa Powder
2 tsp Baking Powder
1/4 tsp Baking Soda
1/2 tsp Salt
1/2 Cup Chopped Semi-Sweet Chocolate (plus more for tops of muffins)
1 Cup Milk
1/2 Cup Vegetable Oil
2 Large Eggs
Trader Joe's Fleur de Sel Caramels (or quality jarred caramel sauce)
Sea Salt 

Heat oven to 375. Line a 12 count muffin tin with paper liners. Whisk dry ingredients (flour, sugar, cocoa powder, baking soda, baking powder and salt) in a large bowl. Add chopped chocolate to bowl and mix. Whisk wet ingredients (milk, oil, eggs) in a small bowl until smooth. Add wet ingredients to dry and stir until just combined. 
Fill muffin cups about two-thirds full. Bake for 8-10 minutes until the edges are set (the center will still be uncooked). Remove from oven and place a caramel into the center of the muffin (if you are using caramel sauce, drop about a teaspoon of sauce into the center of each muffin). Return to the oven and bake for 10-15 more minutes or until a toothpick inserted to the edge of the muffin comes out clean. Do not insert into the caramel!
Remove the muffins from the oven and sprinkle with chocolate and sea salt.
Makes 12 muffins 
These are delicious warm, so heat next day muffins in microwave for about 10 seconds!


Friday, November 2, 2018

Holiday Gift Tags

HOLIDAY GIFT TAGS
So my daughter, Allison and I had a great weekend making Holiday Gift Tags using any and all types of craft materials...card stock, ribbon, buttons, stickers, stamps, glitter and anything else we could find! They are fun and easy to make and a great way to personalize a gift for someone special on your "Nice" list!


Monday, October 15, 2018

Spicy Black Bean Soup

SPICY BLACK BEAN SOUP (Serves 4)

1 1/2 TBS Olive Oil
2 Cloves Garlic, chopped fine
1 Medium Onion, chopped
1 Jalapeno, chopped fine OR 3-4 Anaheim Chiles, roasted, peeled and chopped
1 tsp Kosher Salt
1 tsp Ground Cumin
2 cups Chicken Broth
Three 15 oz cans Black Beans
Sour Cream, Cilantro, Green Onions for garnish
Optional: 1 tsp Frank's Red Hot Sauce
                Pinch Red Pepper Flakes
                Ham Hock

Saute garlic, onions, jalapenos and salt for about 5-6 minutes; stir occasionally; until soft. Add cumin (this is where you would add the Frank's or red pepper flakes or chipotle peppers or any other spice to your liking) and cook for about one more minute. Add chicken broth and two cans black beans. Over medium high heat, bring to a boil, then reduce heat and simmer for 10 minutes. Using an immersion blender, blend until the consistency you desire is achieved. Add the last can of beans to add texture and cook for ten more minutes. Salt and pepper to taste.
Serve with your favorite toppings - sour cream, chopped cilantro, grated cheese, green onions!

***This recipe is easy to adjust to your spice level - if you don't want too much heat, try only half of the jalapeno...to kick it up, add the red pepper flakes or cayenne pepper!
***If you use the ham hock, be careful of the amount of salt added.
***This recipe can easily be vegetarian by using vegetable broth instead of chicken broth. 

Monday, October 8, 2018

Fall Decor

 Decorating for fall is one of our favorite things! Most of the pumpkins have been in my fall supplies for years; some were passed down and some are even from the dollar store! Different sizes, different fabrics and finishes add more dimension! Mix colors and add your own personality! Now go and have a pumpkin spice latte!

Tuesday, October 28, 2014

My 3 Sisters Craft Room, Etsy Listings

What do you get when you mix three creative minds in one room? My3SistersCraftRoom. 

As sisters, we are all very alike but also very different, which sometimes can create the most unique, homemade crafts. We work together on every item we make, and always manage to find time to laugh. Each item is handmade, which means no two items are ever alike.

We hope you enjoy the unique handmade crafts in our shop! You can purchase any of the decorations you see below at https://www.etsy.com/shop/My3SistersCraftRoom

14" Rustic Fall Yarn Wreath, $35

Hand wrapped yarn wreath that has been embellished with hand made felt flowers. This wreath measure 14" across, the perfect size to hang anywhere. The simplistic fall colors will add a warm and rustic feel to any home. Great for any indoor space as well as any covered outdoor space. It is a fantastic way to welcome guests into your home this fall season. 

Vertical Fall Wooden Sign, $15

Wooden blocks act as perfect backdrops for beautifully crafted paper squares. On top of those squares, lay simplistic letters along with whimsical fall leaves and an assortment of rustic buttons. Hanging at 22 in, each block measures 4 in and they are all strung together with Jute twine, adding the perfect country touch. This adorable sign is just right for any home and its vertical shape makes it ideal for any wall or doorway this festive season. 

Gobble til’ you Wobble Wood Sign, $25


After a large Thanksgiving dinner, who wouldn’t feel like wobbling like a fat little turkey? This sign is an one of a kind, hand crafted sign. The wood is hand painted and sanded to add a rustic feel. The wording is ink transferred to the wood and then hand painted to add texture and dimension. The lovable turkey is hand sketch and hand painted, fitted with festive feathers and adds a darling touch to the sign. Embellished with hand crafted leaves and vines. This adorable wooden sign measure 9in wide and 12in long. Our wooden sign is a great way to complete your fireplace mantel decorations and add a whimsical touch to your home. This sign would be the perfect addition to any fall or Thanksgiving display this season.

Santa Ho Ho Ho Christmas Wreath, $42

This wreath is a great way to welcome holiday guest into your home. The wreath measures 19in. across and is for indoor/outdoor displays. The wreath form is hand wrapped with red burlap and embellished with a black burlap belt. Santa's belt is finished with a glittery, silver belt buckle. The letters are wooden and painted white with glitter. The perfect addition to anyone's holiday decorations.

Poinsettia Votives, $22.50 


These poinsettia votives are one of a kind and made from recycled soda cans. Each poinsettia is hand cut to create the perfect flower petals. The poinsettia votives are embellished with winter greens, holly berries, pinecones with a holiday sparkle, and a dusting of snow. Each poinsettia votive ranges in diameter from approximately 8in. to 10in. They are the perfect centerpiece to brighten any holiday table!

Christmas Mason Jars-Hand Painted Santa, Reindeer, Snowman, and Penguin, $12+


These adorable hand-painted, Christmas mason jars are the perfect addition to anyone's holiday decor. Each jar is handcrafted, so no two jars are every alike. These mason jars can be used as vases, tea light votives, or candy jars. They are also a great gift to send to loved ones.

Santa Jar- Hand-painted red, with a painted black belt and glittery, yellow belt buckle. Embellished with white buttons and cotton balls for Santa's beard. 

Reindeer- Hand-painted a two-tone brown, with a shiny red, ribbon collar, and fitted with gold bells. Completed with a red pom-pom nose and brown felt antlers and ears. 

Snowman-The jar is spray painted with Frosted Glass spray paint, while the facial features are hand-painted. Rosy check add a whimsical touch to the snowman. Embellished with a red felt scarf and fake snow. 

Penguin-The jar is spray painted with Frosted Glass spray paint, and the penguins body is hand-painted. Embellished with a set of yellow pom-pom ear muffs and fake snow. 

You can find all these items on our Etsy page: My3SistersCraftRoom

Thursday, October 2, 2014

Mason Jar Jack-O-Lanterns

Here are some more fun Mason Jar Jack-O-Lanterns to spark your creativity!


Here are some of our favorite Disney inspired Jack-O-Lanterns


DIY Mason Jar Jack-O-Lanterns

Just in time for Halloween decorating, these mason jars are quick, easy, and super fun to make. What we love about these mason jar jack-o-lanterns is they will outlast any pumpkin you carve and can be kept inside or outside. Hope you enjoy making these as much as we did. 


Here are the materials you will need to make your mason jar jack-o-lantern:
-Mason Jar
-Tape (masking or electrical)
-Frosted glass spray paint
-Sponge brush
-Acrylic paint (any fall colors you like, plus green for the lid)
-Scissors
-Pen 
-Paper (for sketching)
-Electric tea light 


Steps-
1. Clean your mason jar with water and soap. Make sure the jar is thoroughly dry before spray painting is. 
2. Spray the front of the mason jar with the Frosted Glass Spray paint. Allow to completely dry before continuing on. 

3. Sketch the jack-o-lantern face you would like onto a piece of paper. Then copy the design onto the tape.

4. Cut out the design from the tape and place over the frosted section of your mason jar. 


5. Get ready to paint. Sponge the entire mason jar with paint. Make sure to sponge over the tape design so there are no gaps.

6. Allow to completely dry, before removing the tape. 
7. Once the jar has dried, remove the tape carefully, making sure not to take any of the paint off the jar. 

8. Sponge the lid of the jar with green acrylic paint. Allow to dry completely before placing on the mason jar. 

Enjoy your Mason Jar Jack-O-Lantern, inside or outside. 
 

Sunday, May 18, 2014

Oven "Fried" Chicken Tenders

Everyone loves a good chicken tender. Whether they are dunked in ketchup or ranch, tossed on top of a salad, or placed inside of a sandwich, no one can deny the crunchy, goodness of chicken tenders. 


I like to lighten my chicken tenders up by marinating them in Greek yogurt and then coating them with Corn Flakes. This helps take away the fat from the traditional dreading processes of flour, eggs, and breadcrumbs. Marinating the chicken tenders in Greek yogurt also helps keep the chicken moist while baking. The Corn Flakes add the crunchy and crisp texture that everyone is looking for in a chicken tenders. I promise once you make these oven "fried" chicken tenders you will never go back to the greasy ones from fast food joints. 

Panko-Crusted Salmon

I love fish...my husband does not, so I am always trying to find new recipes for fish that he likes and will eat again. I have made this salmon dish three times now, and each time he tells me, "I would eat this again." I think I have a winner on my hands! Panko-Crusted Salmon! 

Berry Compote

One thing I love about summer is all the fresh berries that are in season, sweet and tart all at the same time. My son loves to eat any kind of berry, blueberries, blackberries, strawberries, you name it he eats it. Since we have a growing boy on our hands, I tend to buy fruit and veggies in bulk at Costco. We generally always eat them before they go bad, but occasionally we cannot get through all the fruit fast enough and this is when I make berry compote. 

You can put the compote on anything you like-waffles, pancakes, ice cream, yogurt, etc. The possibilities are endless!

Tuesday, May 13, 2014

Oven-Dried Blueberries

My son loves, loves, loves blueberries! He eats anything and everything that contains blueberries, and without fail always ask for more. Seeing as fresh blueberries can tend to get a little messy, I started to give him dried blueberries for a snack.

After reading the nutritional facts one day, and seeing how much added sugar is in a 1/4 cup serving, I was shocked! Not to mention, dried blueberries are super expensive to buy in the store, considering my son could eat the entire bag in one day. So I set out on a mission to make dried blueberries at home, and they turned out perfect!

Monday, May 12, 2014

Cinnamon Apple Chips

My son loves cinnamon apple straws, so he will go into our pantry, find the bag, sit on the floor and eat the apple straws until I find him sneaking a snack. My son is 14 months old, so I am pretty impressed he can find the bag of apple straws, since I tend to hide it deep within the pantry for this very reason. So, I set out on a mission to try and find a healthier and cheaper version of apple straws that I could make at home. These Cinnamon Apple Chips hit the spot! They are slightly sweet, have the warming flavor of cinnamon, and are super crunchy. Everything my little boy likes!

Baked Chicken Flautas

Love ordering chicken flautas at your favorite Mexican restaurant? Well now you can make them at home without the greasy mess and guilty feeling after eating them. These chicken flautas are packed with tons of vegetables and delicious flavors. What makes them even better is they are baked in the oven, not fried! Great for a quick, healthy lunch or busy school night dinner. 

Polenta Cakes with Mushroom Ragu

I have never had much luck making polenta, it never turns out as creamy or silky smooth as it should. But now I can buy pre-made polenta in the grocery store and enjoy the creamy texture I am always trying to achieve. I originally saw this recipe on The Chew, and have adapted it to my families liking. Pan-searing these polenta cakes makes the outside crispy while maintaining its creamy texture. Pair with a hearty mushroom ragu and you have a satisfying dinner on the table in no time.

Friday, May 9, 2014

Slow Cooker Corn Chowder

Craving a hearty bowl of soup in the blistering heat of summer? Well this soup allows you to do just that without standing over a hot pot and heating up your entire kitchen. This hearty soup is great for dinner but also light enough for lunch. Sweet corn, salty bacon, and creamy potatoes make this soup dance on your taste buds!

Place all the ingredients in the slow cooker and cook on low for 6-7 hours.

Wednesday, May 7, 2014

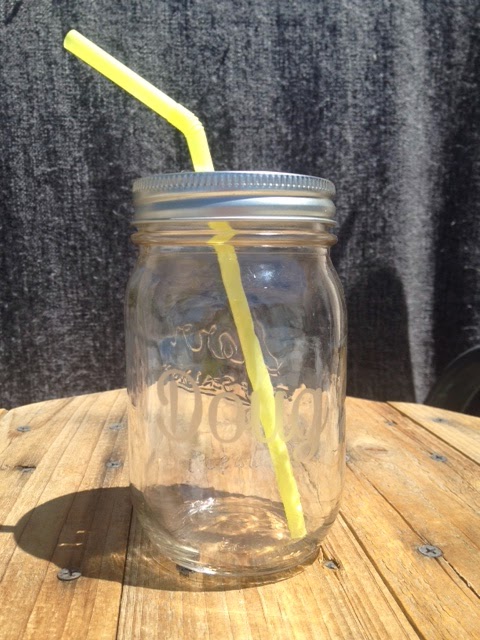
DIY Mason Jar Tumblers

DIY Mason Jar Tumblers

Ok this isn't food, but at the request of Stephanie I'm posting on how I made these adorable mason jar tumblers. I made them for 29 people, we hosted the family for dinner this past Easter. I realized that I didn't have glassware for 29 so this was my solution. Plus everyone got to take theirs home as a gift from me!


Made stencils of everyone's name using contact paper (yeah the fancy green and white stuff was left over from the kitchen cabinets) on the Silhouette Cameo. Clean the jars with rubbing alcohol before applying to get any dirt and oil off the jar. Wear latex gloves to make sure you aren't redepositing oils from your skin on the glass! Make sure that there are NO bubbles around the name or the etching cream with bleed under. 
I used Armour Etch. You can find it in craft stores for about $12.00. I used half of a clothes pin to spread the cream on the stencil. (I couldn't find my stash of craft sticks!)
Here I am spreading it on the name.
Let the etching cream sit on the jar for about 5 minutes. The directions say 1 minute, but more time doesn't hurt. I left these sitting in the sink far away from the granite counter tops. FYI the etching cream will etch granite! (Don't worry, my counter tops were NOT harmed in the process.) 


Now comes the"hard part" putting grommets in the lids. Why do you need a grommet in the lid? For your straw of course!
I used a grommet kit from the hardware store. You can use the fabric grommet kits, but you'll need to drill a hole in your lid to fit the pieces first. The kit I used has a punch for this.
 
The punch is the tube thingy on the left.

After you've got the hole punched place the "male" side of the grommet on the base.
Place your lid on top wrong side up. Then place the "female" side. Insert the tool to pound down the grommet and hit it with your hammer until snug. Don't get overzealous though or you'll warp the lid!
Ta da! You're done! Enjoy your mason jar tumbler with your name! 
By the way if you love these but don't have the time or the desire to DIY, check out my shop on Etsy. You can just order them from me instead! https://www.etsy.com/shop/OliveandOscar?ref=shop_sugg